[PG] PostgreSQL High Availability
這篇文章是我看了 PostgreSQL Replication, High Availability HA and Scalability 這門課後的筆記。
Environment Setup
在這篇文章中,我會在 GCP 上面建立一個 VM (Debian) 來安裝 PostgreSQL (15.10) 來做 demo
sudo apt install postgresql
安裝完之後應該會自行啟動,我們可以透過以下指令來確認是否有啟動
sudo systemctl status postgresql
接著我們可以切換使用者並且進入 psql 來進行操作
sudo -i -u postgres
psql
輸入 \q 即可離開 psql
除此之外我們會使用到 pg_ctl 這個指令,需要先設定 .bashrc 跟 .bash_profile
nano ~/.bashrc
# set export PATH=$PATH:/usr/lib/postgresql/15/bin
nano ~/.bash_profile
# set
# if [ -f ~/.bashrc ]; then
#   . ~/.bashrc
# fi
接著重新登入就會自動載入設定
pg_ctl --version
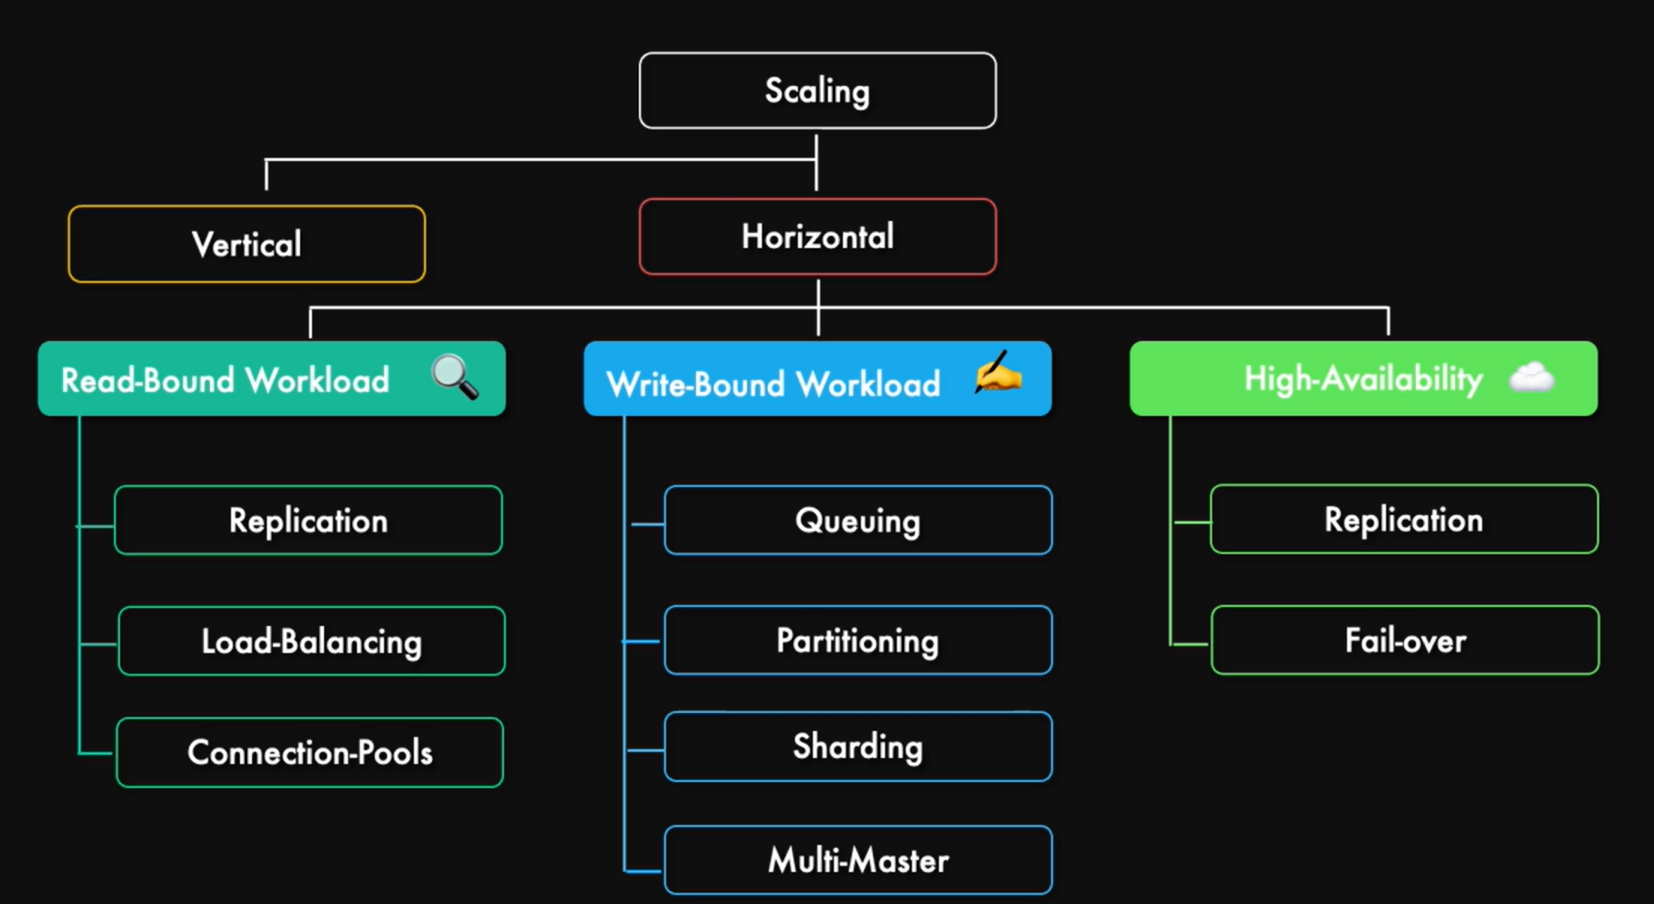
Scaling PostgreSQL
當我們的資料庫需要處理大量的資料時,我們首先需要檢查我們的資料庫是否已經達到其處理能力的極限,像是 SQL 優化或參數調整等等, 如果還是沒辦法提供足夠的效能,我們就需要考慮擴充我們的資料庫
擴充資料庫的方式大致分為以下兩種 :
- Vertical Scaling: 增加資源,像是 CPU、Memory、Storage 等等
- Horizontal Scaling: 增加節點,像是增加資料庫節點、增加資料庫叢集等等
Streaming Replication
Streaming Replication 是 PostgreSQL 用來實現高可用性的主要機制,它透過將主節點的 WAL 日誌傳送到從節點,從而實現接近實時的資料同步。
在 PostgreSQL 中預設的執行方式是非同步的,說主節點在執行完一個 transaction 後,不需要等待從節點確認收到 WAL 日誌,就可以繼續執行下一個 transaction。 這種方法的好處是效能較高,缺點是如果發生故障,可能會因為 WAL 缺少而導致資料不一致。 我們也可以設置為同步,這樣主節點在執行完後,需要等待從節點確認收到 WAL 日誌,才能繼續執行, 這種方法的好處是資料一致性較高且可以保證資料的完整性,缺點是效能較低。
我們可以針對不同的資料 (table),來選擇不同的方式。
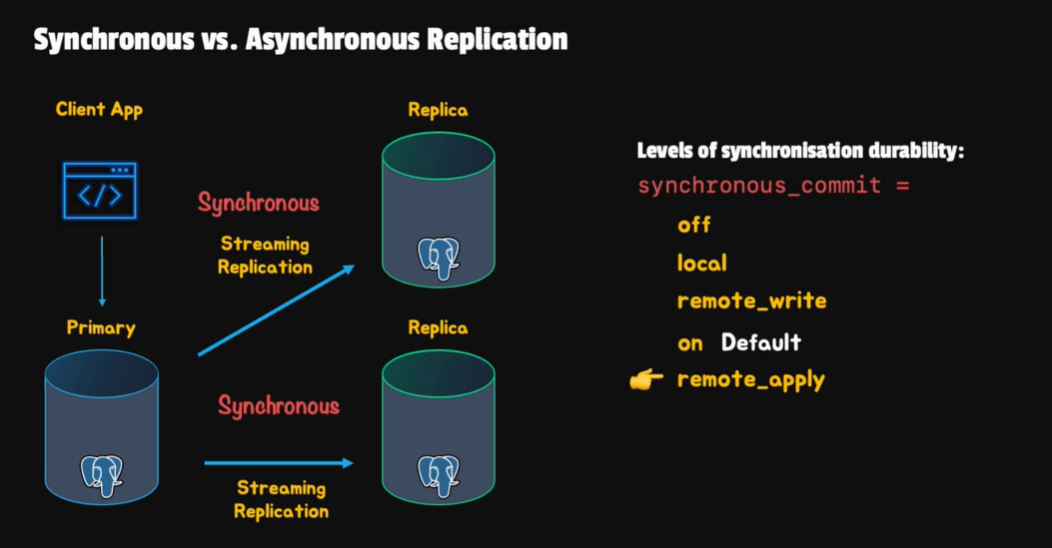
synchronous_commit 的設定有以下幾種 :
off: 只寫入 shared buffer,不保證寫入 WAL 日誌local: 寫入 WAL buffer,並同步到本地的硬碟remote_write: 主節點寫入硬碟,從節點的 WAL buffer 收到但不保證寫入硬碟remote_apply: 在單機狀態下與local相同,在多機環境下,主節點寫入硬碟,從節點收到並寫入硬碟on: 主節點寫入硬碟,從節點收到並寫入硬碟並成功應用
首先使用 initdb 來初始化資料庫集群,資料庫集群是由單個資料庫實例所管理的資料庫集合。
which initdb
/usr/lib/postgresql/15/bin/initdb
initdb -D /tmp/primary_db/
nano /tmp/primary_db/postgresql.conf
# set listen_addresses to '*'
# set port to 5433

# set permission
sudo chown -R postgres:postgres /tmp/primary_db

sudo -i -u postgres
pg_ctl -D /tmp/primary_db start
psql --port=5433 postgres

create user requser replication;

nano /tmp/primary_db/pg_hba.conf
# add the following line
# host all requser 127.0.0.1/32 trust

sudo -i -u postgres
pg_ctl -D /tmp/primary_db restart
接著我們創建一個 replication 的資料庫,並使用 pg_basebackup 來進行複製
pg_basebackup -h localhost -U requser --checkpoint=fast -D /tmp/replica_db -R --slot=some_slot -C --port 5433
nano /tmp/replica_db/postgresql.conf

# set listen_addresses to '*'
# set port to 5434
pg_ctl -D /tmp/replica_db start
最後讓我們來做主節點的測試
psql --port=5433 postgres
SELECT * FROM pg_stat_replication;
-- result
-[ RECORD 1 ]----+------------------------------
pid              | 595
usesysid         | 16384
usename          | requser
application_name | walreceiver
client_addr      | ::1
client_hostname  |
client_port      | 49798
backend_start    | 2024-08-03 12:15:14.549951+00
backend_xmin     |
state            | streaming
sent_lsn         | 0/3000148
write_lsn        | 0/3000148
flush_lsn        | 0/3000148
replay_lsn       | 0/3000148
write_lag        |
flush_lag        |
replay_lag       |
sync_priority    | 0
sync_state       | async
reply_time       | 2024-08-03 12:33:45.648063+00
從節點的測試
psql postgres --port=5434
SELECT * FROM pg_stat_wal_receiver;
-- result
-[ RECORD 1 ]---------+-----------------------------------------------------------------------------------------------------------------------------------------------------------------------------------------------------------------------------------------------------------------------------------------------------------------------------------------------------------------
pid                   | 594
status                | streaming
receive_start_lsn     | 0/3000000
receive_start_tli     | 1
written_lsn           | 0/3000148
flushed_lsn           | 0/3000148
received_tli          | 1
last_msg_send_time    | 2024-08-03 12:36:45.703365+00
last_msg_receipt_time | 2024-08-03 12:36:45.70343+00
latest_end_lsn        | 0/3000148
latest_end_time       | 2024-08-03 12:15:14.551133+00
slot_name             | some_slot
sender_host           | localhost
sender_port           | 5433
conninfo              | user=requser passfile=/var/lib/postgresql/.pgpass channel_binding=prefer dbname=replication host=localhost port=5433 fallback_application_name=walreceiver sslmode=prefer sslcompression=0 sslcertmode=allow sslsni=1 ssl_min_protocol_version=TLSv1.2 gssencmode=prefer krbsrvname=postgres gssdelegation=0 target_session_attrs=any load_balance_hosts=disable
接著我們在主節點上創建一個 table,然後在從節點上查詢,看看是否能夠查詢到
CREATE TABLE test_table (id SERIAL PRIMARY KEY, name VARCHAR(255));
INSERT INTO test_table (name) VALUES ('test');
SELECT * FROM test_table;
-- result
 id | name
----+------
  1 | test
如果在兩台機器上都能夠查詢到,代表我們的 streaming replication 是成功的
最後關閉資料庫
sudo -i -u postgres
pg_ctl -D /tmp/primary_db stop
pg_ctl -D /tmp/replica_db stop
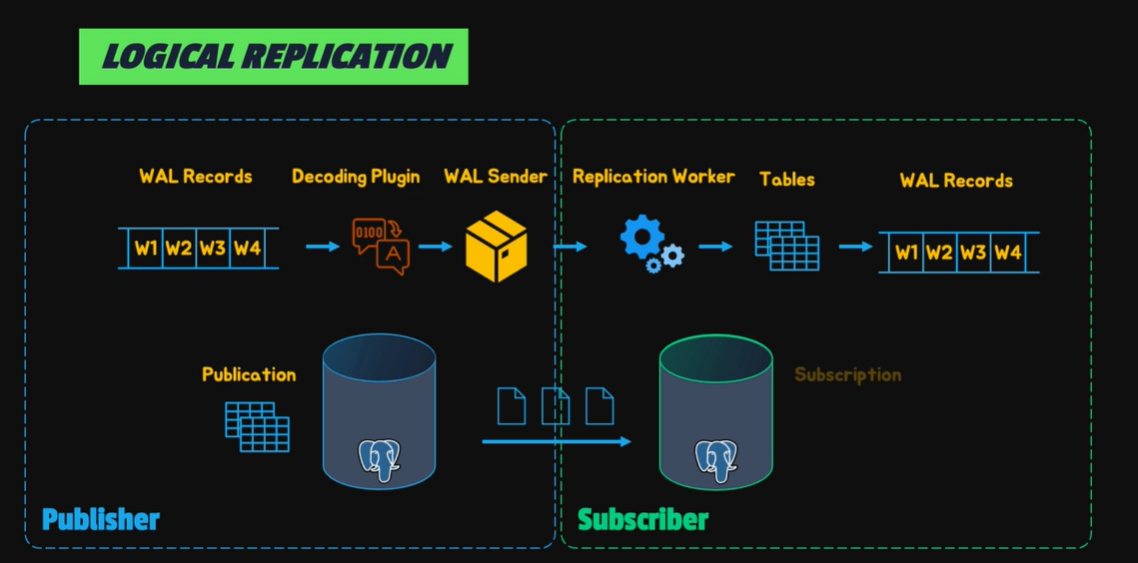
Logical Replication
logical replication 是一種透過將 SQL 語句來進行複製的方式,
這種方式的好處是資料複製的效能較高適用於網路環境較差的地方,且可以在不同版本之間進行複製,同時也可以選擇複製特定的資料,
缺點是無法執行一些 DDL 的指令,像是 CREATE TABLE 或是 ALTER TABLE 等等,
同時 sequence 的值默認也不會複製,這代表如果需要 failover 的話,需要另外處理 sequence 的值
創建資料庫並修改參數
initdb -D /tmp/publish_db/
initdb -D /tmp/subscribe_db/

sudo chown -R postgres:postgres /tmp/publish_db
sudo chown -R postgres:postgres /tmp/subscribe_db
sudo -i -u postgres

nano /tmp/publish_db/postgresql.conf
# set wal_level to logical
# set port to 5433

nano /tmp/subscribe_db/postgresql.conf
# set port to 5434

sudo -i -u postgres
pg_ctl -D /tmp/publish_db start
pg_ctl -D /tmp/subscribe_db start
創建好表,並使用 pg_dump 來複製資料
psql postgres --port=5433

CREATE DATABASE pub;
\c pub
CREATE TABLE test_table (id SERIAL PRIMARY KEY, name VARCHAR(255));
INSERT INTO test_table (name) VALUES ('test');

exit
psql postgres --port=5434
CREATE DATABASE sub;

exit
pg_dump -t test_table -p 5433 -s pub | psql -p 5434 -d sub
創建 publication 和 subscription
sudo -i -u postgres

psql pub --port=5433
CREATE PUBLICATION test_publication FOR TABLE test_table;

psql sub --port=5434
CREATE SUBSCRIPTION test_subscription CONNECTION 'host=localhost port=5433 user=rulerchen dbname=pub' PUBLICATION test_publication;
# -- (需要改 user)

SELECT * FROM test_table;
接著我們可以透過 pg_stat_replication 來查看 replication 的狀態,並注意 lag 的部分
write_lag: 主節點寫入 WAL 的時間flush_lag: 主節點將 WAL 刷新到磁盤的時間replay_lag: 從節點應用 WAL 的時間
SELECT * FROM pg_stat_replication;
-- result
-[ RECORD 1 ]----+------------------------------
pid              | 222
usesysid         | 10
usename          | postgres
application_name | test_subscription
client_addr      | ::1
client_hostname  |
client_port      | 36752
backend_start    | 2024-08-04 07:23:31.011034+00
backend_xmin     |
state            | streaming
sent_lsn         | 0/196EA40
write_lsn        | 0/196EA40
flush_lsn        | 0/196EA40
replay_lsn       | 0/196EA40
write_lag        |
flush_lag        |
replay_lag       |
sync_priority    | 0
sync_state       | async
reply_time       | 2024-08-04 07:41:12.252314+00
我們也可以使用以下指令來查看 publication 和 subscription 的狀態
\dRp
-- result
List of publications
-[ RECORD 1 ]----------------
Name       | test_publication
Owner      | postgres
All tables | f
Inserts    | t
Updates    | t
Deletes    | t
Truncates  | t
Via root   | f
\dRs
-- result
List of subscriptions
-[ RECORD 1 ]-------------------
Name        | test_subscription
Owner       | postgres
Enabled     | t
Publication | {test_publication}
最後關閉資料庫
sudo -i -u postgres
source ~/.bashrc
pg_ctl -D /tmp/publish_db stop
pg_ctl -D /tmp/subscribe_db stop
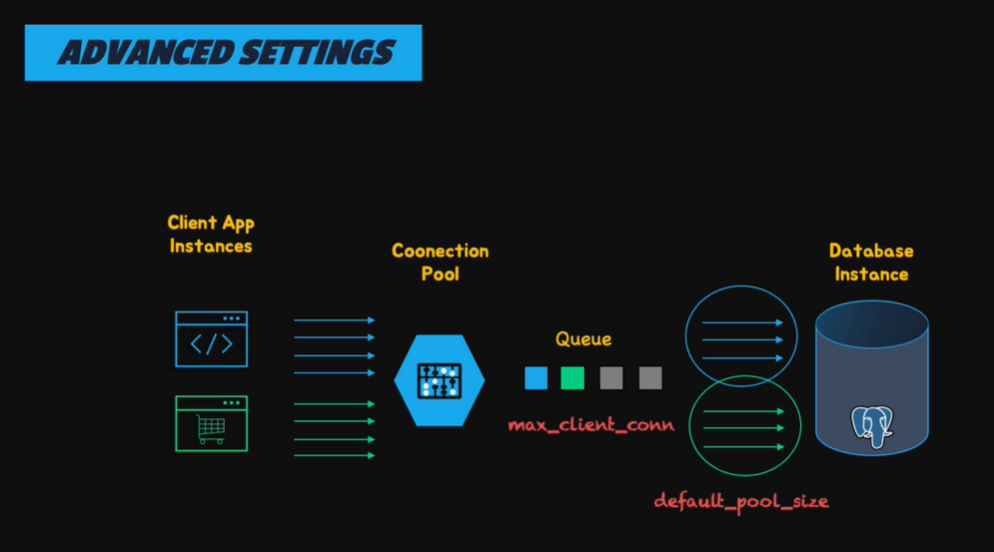
PgBouncer
在正常的情況下,PostgreSQL 可以在一秒鐘處理約 350 個 transaction, 如果超過的話就可以考慮使用 connection pool 來進行優化, 這樣可以減少每次連接資料庫時創建 process (fork) 所需要消耗的資源
PgBouncer 本身沒有支援 multi-host、failover 以及 load balancing, 所以如果需要這樣的功能,我們需要使用其他的工具
pgbouncer 包含三種模式 :
session: 默認和最安全的模式,client 在連接期間,會持續保持連接,直到 session 結束transaction: client 僅在 transaction 期間保持與資料庫的連接statement: 每個 SQL 語句執行後,連接就會返回到池中
接下來我們會安裝 pgbouncer 並且進行簡單的設定
initdb -D /tmp/pgbouncer_db/
sudo chown -R postgres:postgres /tmp/pgbouncer_db

sudo -i -u postgres
pg_ctl -D /tmp/pgbouncer_db start
sudo apt install pgbouncer
cd /etc/pgbouncer
sudo cp pgbouncer.ini pgbouncer.ini.bak # 備份原本的設定
sudo nano pgbouncer.ini
# set test_db = dbname=postgres host=localhost port=5432 auth_user=postgres
psql -p 5432 postgres
CREATE USER postgres SUPERUSER;
啟動 pgbouncer
sudo -i -u postgres
/usr/sbin/pgbouncer /etc/pgbouncer/pgbouncer.ini
# 記得先關閉 pgbouncer
# sudo systemctl stop pgbouncer

# adjust min_pool_size、default_pool_size、max_client_conn to appropriate value
接著我們可以透過 pgbench 來進行壓力測試
sudo touch /tmp/pgbouncer_db/test.sql
sudo nano /tmp/pgbouncer_db/test.sql
# SELECT 1;

sudo -i -u postgres
pg_ctl -D /tmp/pgbouncer_db start
exit

pgbench -i postgres
sudo chmod 755 /tmp/pgbouncer_db/
沒有 pgbouncer 的情況
pgbench -c 10 -t 500 -S postgres -C -f /tmp/pgbouncer_db/test.sql -p 5432
# -- result
pgbench (15.10 (Debian 15.10-0+deb12u1))
starting vacuum...end.
transaction type: multiple scripts
scaling factor: 1
query mode: simple
number of clients: 10
number of threads: 1
maximum number of tries: 1
number of transactions per client: 500
number of transactions actually processed: 5000/5000
number of failed transactions: 0 (0.000%)
latency average = 44.289 ms
average connection time = 4.395 ms
tps = 225.789016 (including reconnection times)
SQL script 1: <builtin: select only>
 - weight: 1 (targets 50.0% of total)
 - 2453 transactions (49.1% of total, tps = 110.772091)
 - number of failed transactions: 0 (0.000%)
 - latency average = 17.399 ms
 - latency stddev = 11.772 ms
SQL script 2: /tmp/pgbouncer_db/test.sql
 - weight: 1 (targets 50.0% of total)
 - 2547 transactions (50.9% of total, tps = 115.016925)
 - number of failed transactions: 0 (0.000%)
 - latency average = 16.865 ms
 - latency stddev = 11.840 ms
有 pgbouncer 的情況
sudo -i -u postgres
pgbench -c 10 -t 500 -S test_db -C -f /tmp/pgbouncer_db/test.sql -p 6432
# -- result
pgbench (15.10 (Debian 15.10-0+deb12u1))
starting vacuum...end.
transaction type: multiple scripts
scaling factor: 1
query mode: simple
number of clients: 10
number of threads: 1
maximum number of tries: 1
number of transactions per client: 500
number of transactions actually processed: 5000/5000
number of failed transactions: 0 (0.000%)
latency average = 5.059 ms
average connection time = 0.432 ms
tps = 1976.638505 (including reconnection times)
SQL script 1: <builtin: select only>
 - weight: 1 (targets 50.0% of total)
 - 2468 transactions (49.4% of total, tps = 975.668766)
 - number of failed transactions: 0 (0.000%)
 - latency average = 2.538 ms
 - latency stddev = 1.538 ms
SQL script 2: /tmp/pgbouncer_db/test.sql
 - weight: 1 (targets 50.0% of total)
 - 2532 transactions (50.6% of total, tps = 1000.969739)
 - number of failed transactions: 0 (0.000%)
 - latency average = 2.361 ms
 - latency stddev = 1.460 ms
可以觀察到 tps 有明顯的提升,從 225 提升到 1976。
pgbench 的參數說明如下 :
-i: 初始化資料庫-c: 同時執行的 client 數量-t: 每個 client 執行的 transaction 數量-S: 使用 simple query mode-C: 為每個 transaction 創建一個新的連接-f: 指定要執行的 SQL 檔案-p: 指定 port
Partition
對於資料量大的表,不管是查詢或是 vacuum 都會需要較長的時間,這時候我們可以考慮將表進行分割提升效能
在新版的 PostgreSQL 中,partition 多使用 declarative 的方式來進行分割,而不是 inheritance 的方式。
partition 的方法大致有以下四種 :
- Range Partition: 依照範圍來進行分割,像是時間、數值等等
- List Partition: 依照特定的值來進行分割
- Hash Partition: 依照 hash 值來進行分割
- Composite Partition: 結合以上兩種或多種方式來進行分割
sudo -i -u postgres
pg_ctl -D /tmp/primary_db start
psql --port=5433 postgres
CREATE TABLE customers (
    id INT,
    name TEXT,
    age NUMERIC
) PARTITION BY RANGE (age);

CREATE TABLE customers_young PARTITION OF customers FOR VALUES FROM (MINVALUE) TO (25);
CREATE TABLE customers_adult PARTITION OF customers FOR VALUES FROM (25) TO (65);
CREATE TABLE customers_old PARTITION OF customers FOR VALUES FROM (65) TO (MAXVALUE);

INSERT INTO customers (id, name, age) VALUES (1, 'John Doe', 20), (2, 'Jane Doe', 30), (3, 'John Smith', 60), (4, 'Jane Smith', 70);

SELECT tableoid::regclass, * FROM customers;
-- result
    tableoid     | id |    name    | age
-----------------+----+------------+-----
 customers_young |  1 | John Doe   |  20
 customers_adult |  2 | Jane Doe   |  30
 customers_adult |  3 | John Smith |  60
 customers_old   |  4 | Jane Smith |  70
(4 rows)
Sharding
sharding 是將資料分割到多個資料庫,以減輕單個資料庫的負擔。
sharding 的關鍵在於如何選擇 sharding key, 我們需要依據業務場景來選擇合適的 sharding key, 來保證我們的查詢或寫入盡量落在同一個資料庫中。
PostgreSQL High Availability
在生產環境中,我們需要考慮在各種不同的環境下都能穩定地提供服務,這時候我們就需要考慮高可用性的問題
HA 主要分為三個步驟 :
- replication : 主節點將資料複製到從節點,以保證資料的一致性
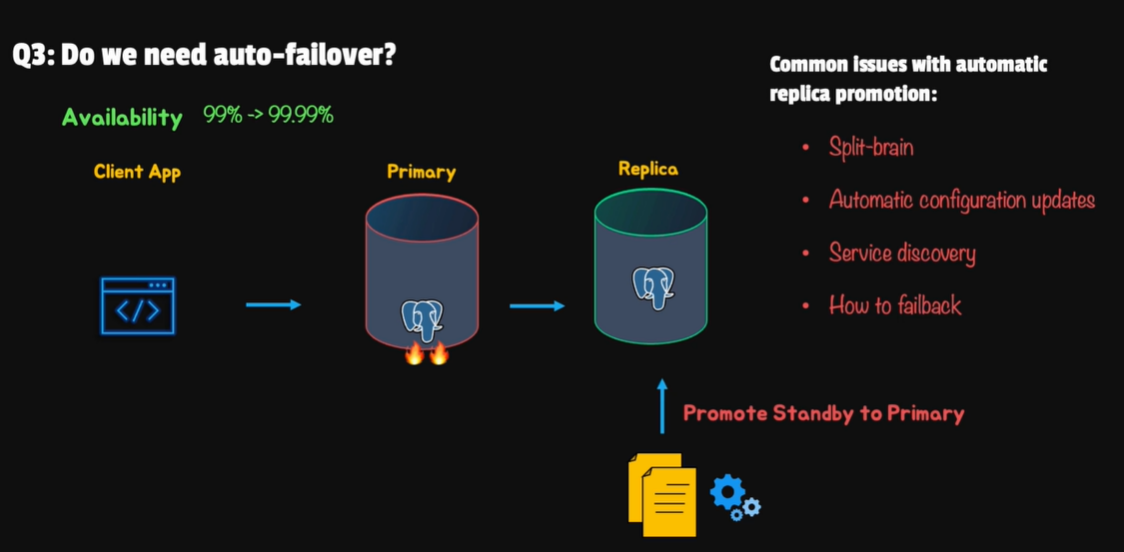
- failover : 當主節點故障時,從節點自動升級為主節點
pg_ctl promotepgpool IIPAFPatroniRepmgr
- failback : 當主節點恢復正常時,從節點降級為從節點
pg rewindpgpool IIPAFPatroniRepmgr
在處理 HA 之前要先了解以下幾個問題 :
- 資料的重要性
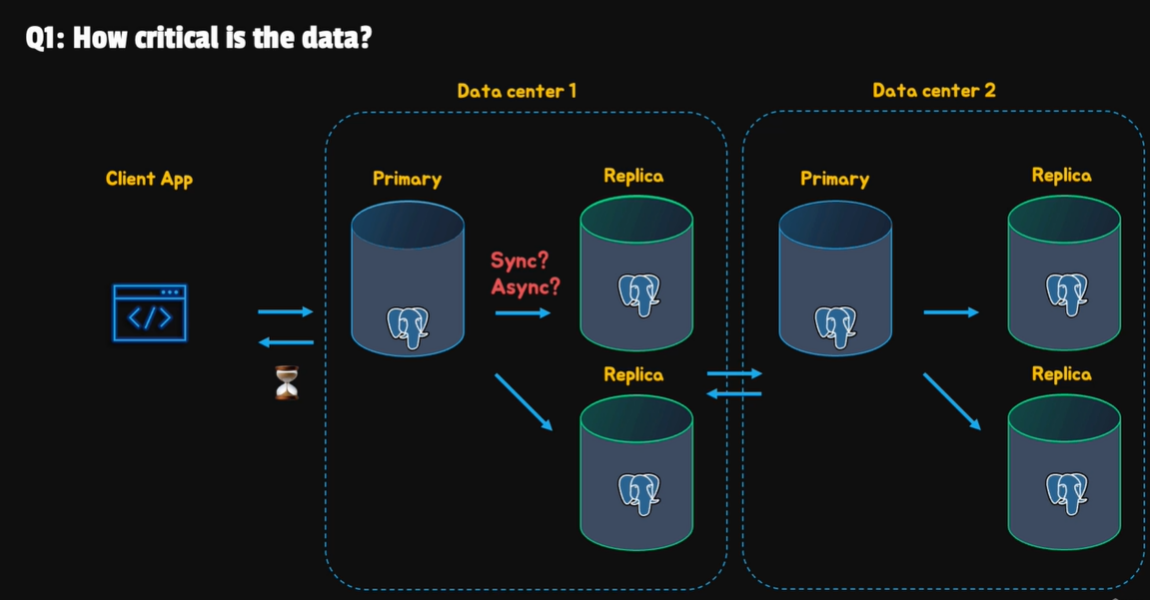
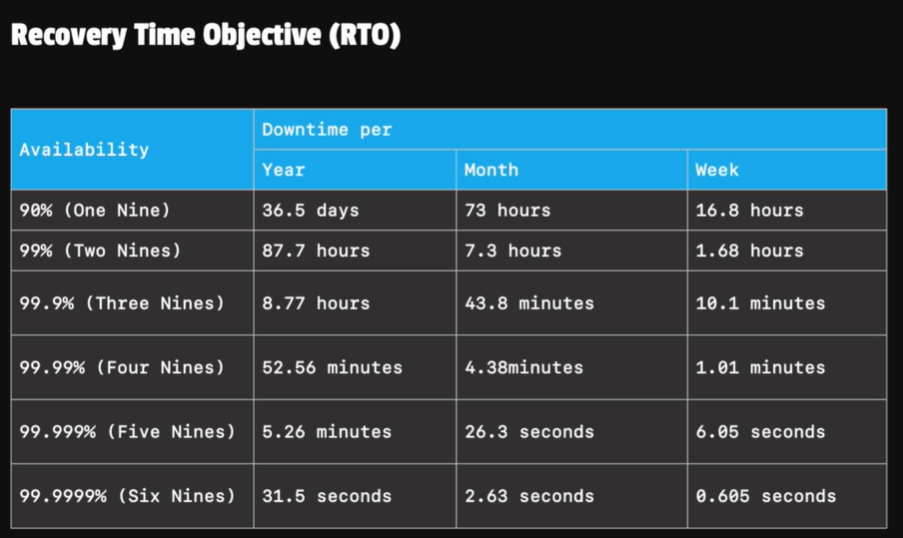
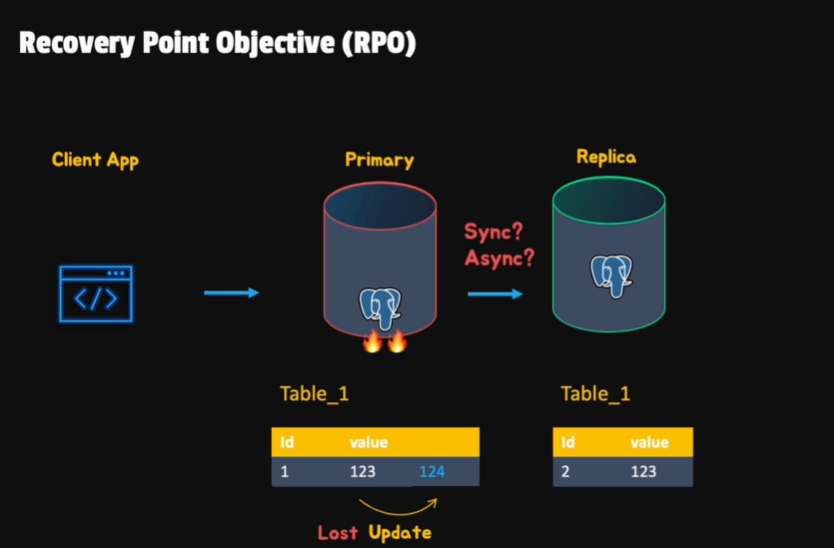
- RTO (Recovery Time Objective) && RPO (Recovery Point Objective)
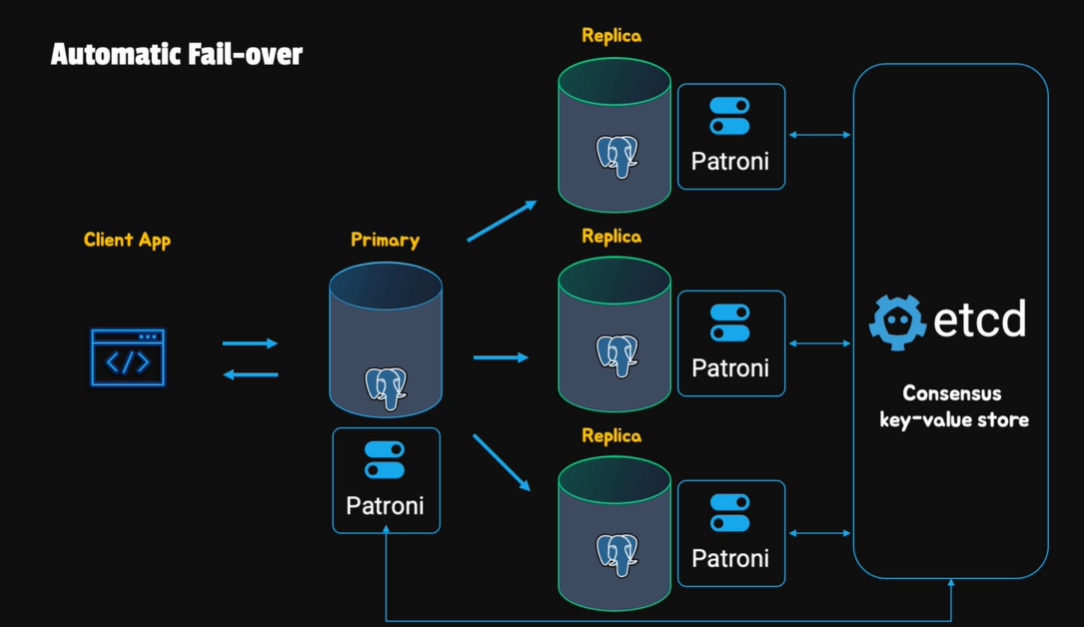
- Auto failover 的機制
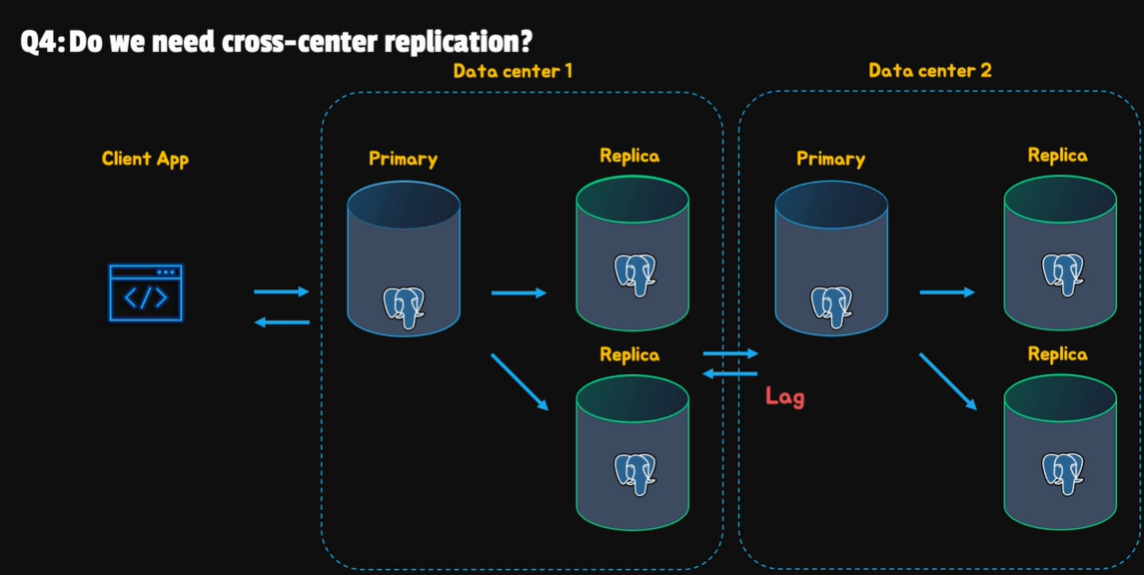
- Cross-center replication
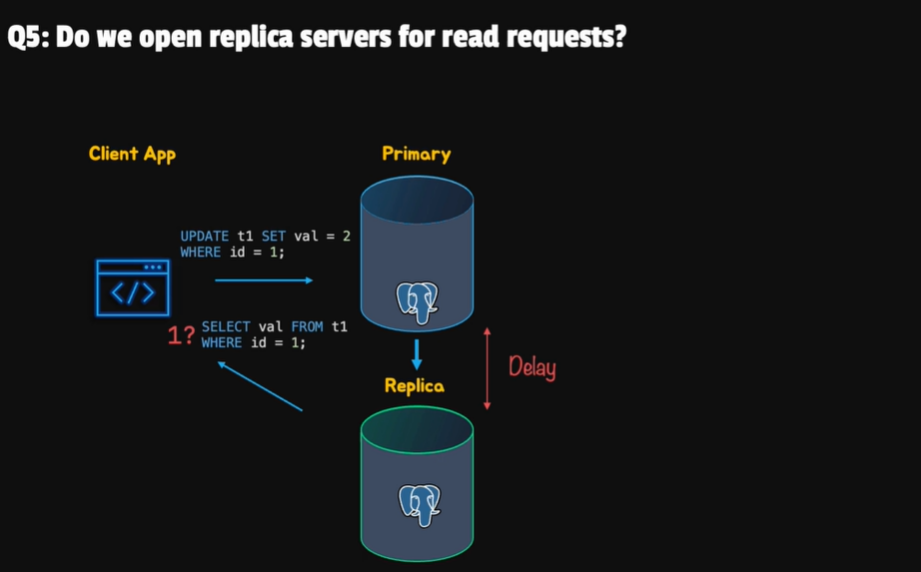
- Do we open replication for read
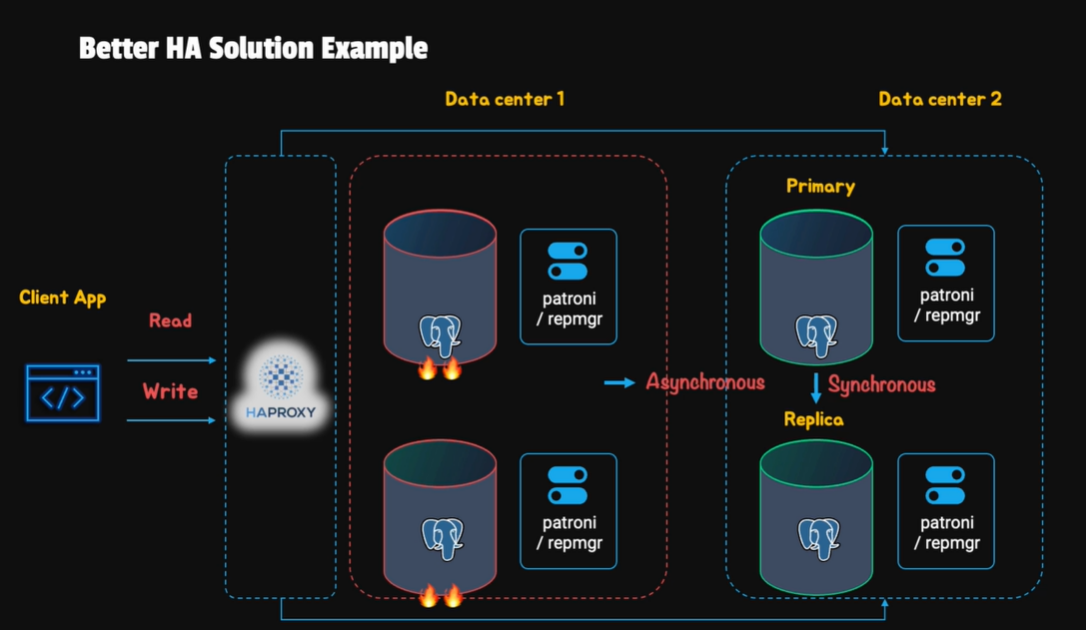
一個基本的架構圖大致如下 :
Pgpool II
pgpool 是一個位在資料庫跟客戶端的 middleware, 可以提供 load balancing、failover、connection pooling 等功能, 是一個很好的 HA 解決方案
接下來會示範 pgpool 的簡易設定 :
首先需要設定 streaming application,跟之前的設定相同,並安裝 pgpool
sudo -i -u postgres
pg_ctl -D /tmp/primary_db start
pg_ctl -D /tmp/replica_db start
接下來我們會先設定 load balance 的部分,將 SELECT 的 query 導向 replica,其他的 query 導向 primary
sudo apt install pgpool2

cd /etc/pgpool2
sudo nano pgpool.conf
# set listen_addresses to '*'

# set backend_hostname0 to localhost
# set backend_port0 to 5433
# set backend_weight0 to 0
# set backend_data_directory0 to '/tmp/primary_db/'

# set backend_hostname1 to localhost
# set backend_port1 to 5434
# set backend_weight1 to 1
# set backend_data_directory1 to '/tmp/replica_db/'

# set log_statement to 'on'
# set log_per_node_statement to 'on'

# set sr_check_user to 'requser'

# set health_check_period to 10
# set health_check_user to 'requser'

sudo systemctl stop pgpool2
sudo /usr/sbin/pgpool -n -f /etc/pgpool2/pgpool.conf
接著嘗試連線
psql -p 9999 postgres
CREATE TABLE table1 (id SERIAL PRIMARY KEY, name VARCHAR(255));
INSERT INTO table1 (name) VALUES ('test');
SELECT * FROM table1;
在 pgpool 的 log 中我們可以看到 query 是如何被導向的
2024-12-27 02:58:32.383: psql pid 40763: LOG:  DB node id: 0 backend pid: 40797 statement: CREATE TABLE table1 (id SERIAL PRIMARY KEY, name VARCHAR(255));
2024-12-27 02:58:35.931: psql pid 40763: LOG:  DB node id: 0 backend pid: 40797 statement: INSERT INTO table1 (name) VALUES ('test');
2024-12-27 02:59:00.839: psql pid 40763: LOG:  DB node id: 1 backend pid: 40798 statement: SELECT * FROM table1;
SELECT 被導向到 node 1,其他的 query 則被導向到 node 0
接著我們會利用 pgpool 來實現 HA :
首先我們會先修改 primary 的設定,將 synchronous 修改為 remote_apply,並且設定 wal_log_hints 為 on (方便使用 pg_rewind 來進行 failback)
sudo nano /tmp/primary_db/postgresql.conf

# set synchronous_commit to remote_apply
# set synchronous_standby_names to '*'
# set wal_log_hints to on

sudo -i -u postgres
pg_ctl -D /tmp/primary_db restart
新增一個檔案來當作 failover 的 script
sudo nano /tmp/failover.sh
#! /bin/sh
failed_node=$1
trigger_file=$2

if [$failed_node = 1];
then exit 0;
fi

touch $trigger_file
exit 0;
接著修改 pgpool 的設定
sudo nano /etc/pgpool2/pgpool.conf

# set failover_command to '/tmp/failover.sh %d /tmp/replica_db/down.trg'
接著修改 replica 的設定
sudo nano /tmp/replica_db/postgresql.conf

# set promote_trigger_file to '/tmp/replica_db/down.trg'

sudo -i -u postgres
pg_ctl -D /tmp/replica_db restart
接著來做測試,我們會啟動 pgpool 並把 primary_db 關閉來測試結果
sudo systemctl stop pgpool2
sudo chmod +x /tmp/failover.sh
sudo /usr/sbin/pgpool -n -f /etc/pgpool2/pgpool.conf

sudo -i -u postgres
pg_ctl -D /tmp/primary_db stop
停止 primary 之後,我們可以看到 pgpool 的 log 中有 failover 的訊息
2024-12-27 14:32:55.722: main pid 51351: LOG:  execute command: /tmp/failover.sh 0 /tmp/replica_db/down.trg
2024-12-27 14:32:55.750: main pid 51351: LOG:  find_primary_node_repeatedly: waiting for finding a primary node
2024-12-27 14:32:55.755: main pid 51351: LOG:  find_primary_node: standby node is 1
2024-12-27 14:32:56.760: main pid 51351: LOG:  find_primary_node: standby node is 1
2024-12-27 14:32:57.765: main pid 51351: LOG:  find_primary_node: primary node is 1
2024-12-27 14:32:57.766: main pid 51351: LOG:  failover: set new primary node: 1
2024-12-27 14:32:57.766: main pid 51351: LOG:  failover: set new main node: 1
接著我們可以嘗試連線到 pgpool 來查看是否真的連接到了 replica
psql -p 9999 postgres
SHOW port;
# -- result
 port
------
 5434
(1 row)
這樣代表我們成功連到了第二個節點,完成了 failover 的測試
最後,當我們的故障節點恢復正常時,我們就可以使用 pg_rewind 來進行 failback